Subframe reinforcement kit, for 2019+ KTM 690 Enduro and GasGas ES/SM 700 - Installation Instructions
These instructions are for 2019+ KTM 690 Enduro R. They apply to GasGas ES/SM 700 too.
For 2008-2018 KTM 690 Enduro R or Husqvarna 701 Enduro - check HERE.
In order to replace lower OEM bolt sleeve and rubber bushings tank needs to be lifted few cm's. In order to do that, air box needs to be removed and that consumes most of the time. We made a blog post with instructions for removing air box - check HERE.
When you remove parts from the bike, during disassembly, make sure to write down which bolt is removed from where, so you know how to reassemble it.
Instructions for Perun moto KTM 690 Enduro Subframe reinforcement kit - upper and lower.
1. Remove air box.
2. Remove gas cap. Make sure to secure it with clean rug or similar, to prevent something (lost bolt?) from entering the fuel tank.

3. Remove bolt holding the rear fairing from below, it is in the hole...

...then slide rear fairing towards rear and remove it.

4. Remove bolts marked with green.

5. Remove bolts marker with green circles...

...then remove RHS rear side fairing by pulling it towards rear.

6. Remove bolt marked with green circle. Remove bolt marked with blue circle. It is not well visible on the picture, but it's there...
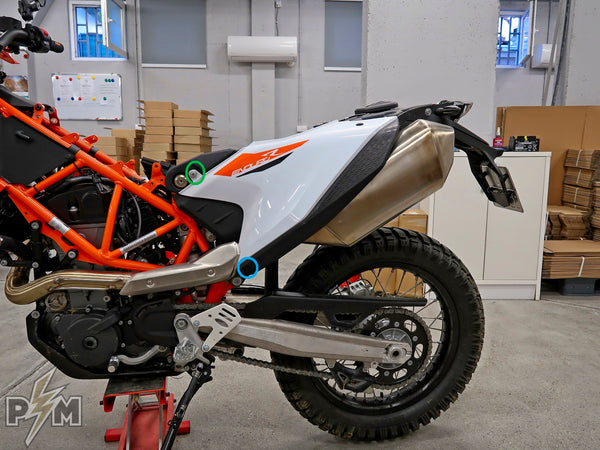
...then remove LHS rear side fairing by pushing it towards rear.

7. Remove bolt marked with green arrow, holding silencer to the silencer bracket. Leave the bracket bolted to the tank as is.

8. Tank will be flipped over later, so disconnect fuel quick-connect.

9. Loose upper tank bolts, both sides, so later tank can be rotated over easily. Just loose them a bit, don’t take them out.

10. Remove bolt, marked with green circle. If it starts spinning, hold the bolt on the other side.

Keep OEM countersunk washer, it will be reused.

11. Remove bolt on the other side. If it starts spinning, use allen key (size 5) to secure stainless sleeve from spinning, from the other side. There is hex socket deep inside the sleeve.


12. Now tank can be lifted. It needs to be lifted just a little bit, approx 10 cm, so OEM rubber bushings can be removed out of the tank. Lift it slowly and be careful not to brake any hose or wires.Use a tie or a rope to secure the tank in upper position.

13. Push OEM sleeve out and remove OEM rubber bushings out of the tank, on both sides. Just pull them out.


14. Clean the hole, apply some grease on Perun moto bushings (both on the inside and outside) and insert them into the circular pocket on the tank. Tap bushings lightly, if needed.


Then insert Perun moto stainless sleeve, as shown on photo. Make sure it protrudes bushings on both sides evenly.


Now lower the tank in original position.
Make sure exhaust fits back into exhaust bracket! Secure it with a bolt, but don't tighten it up yet.

15. Use OEM countersunk washer with Perun moto countersunk bolt, as shown below.

Insert the bolt and washer, from exhaust side. It may be necessary to wiggle the tank up and down a bit, to align all holes so bolt can be inserted completely.


Then use washer and nut on the other side. Don't tighten it up yet. Tighten it up after you install upper bolts and bolt caps.

Now it's time to install upper bolts.
16. Remove OEM upper bolt from one side only. Other one needs to stay and hold the tank.
17. Check OEM rubber bushings, they need to be circular and without damage. Check these bushings from time to time, once or twice a year. If they deform, change them for new ones.

18. Insert Perun moto bolt (button headM8x25) from the inside.

Tighten it up, using torque wrench - 12-15 Nm is more than enough.
Don't over-tighten it, you will stress threaded tab welded to the frame!

19. Apply some thread locker (Loctite 243) into Perun moto bolt cap.

Then insert bolt cap as shown on photo below. Position it and screw it onto the bolt. It may be necessary to wiggle the tank up and down a bit, to mate it with the bolt.
Hold the bolt from the other side, to stop it from spinning.
Tighten bolt cap lightly, by hand or up to 5 Nm! You will tighten it up to the final spec after all is installed.


20. Now repeat on the other side (from section 16 to 19).
21. Once both upper caps are installed and inside bolts are tightened up to proper spec, you can tighten up bolt caps to 12-15 Nm.
Hold the bolt on the other side to prevent it from spinning. It's important to prevent the inside bolt from spinning while tightening up bolt cap!
22. Now tighten up lower bolt and nut.
Hold the bolt to prevent it from spinning and tighten up the nut to 12-15 Nm. Holding the bolt and tightening up the nut will prevent stripping hex socket in the bolt.
Make sure to use quality allen keys and bits!
Upper and lower Perun moto tank bolts are installed. Now everything needs to be reassembled in backward order. Few tips follow.
23. Apply some grease on the O-ring and connect fuel quick disconnect.

24. Don't forget to tighten up bolt holding the silencer.
25. Make sure to mate LHS side fairing with the heat shield bracket.

26. Make sure to do the same when mounting tail fairing.


27. Reinstall the airbox, following instructions from blog post.
Once in a while, check upper rubber bushings for wear and replace if necessary.