Perun moto Yamaha Tenere 700 Side Carriers - Installation Instructions
Content of the kit
- 2 x Side Carrier base (LHS and RHS) - large sheet metal parts
- 2 x Side Carrier bracket (LHS and RHS) - small sheet metal parts
- 1 x Undermount bracket - billet aluminum part
- 4 x 20/8.2-25 spacer
- 4 x M8x50 countersunk bolt
- 4 x M8 countersunk 3D washer
- 2 x M6x40 allen head bolt
- 4 x M6x25 allen head bolt
- 4 x M6x20 buttonhead bolt
- 12 x M6 flat washer
- 4 x M6 safety nut

A. Installation of Tenere 700 Side Carriers
1.Undo the stock bespoke bolts and clear the threaded holes marked with purple. On both sides.
If you have Perun moto Yamaha T700 Top Luggage rack installed, remove it. You will install it back, later.

2. Remove two rear stock M6 hex head bolts and washers, marked with blue. They are on the underside, above the rear tire.

3. Prepare Undermount bracket and 2 x M6x40 allen head bolts. Use thread-locker (Loctite 243 or similar). No matter which side.

4. Install the Underside bracket, like shown in the photo. Torque the bolts to 8 Nm.

5. Insert 20/8.2-25 spacers, as shown on the photo. On both sides.

6. Install RHS Side carrier base, as shown in the photo. Insert M8x50 countersunk bolts and M8 countersunk 3D washers. Tighten front bolt by hand. Loosely tighten rear bolt, so Carrier can move a bit.


7. Install RHS Side carrier bracket - use M6x25 allen head bolts and M6 flat washers to bolt it to the Underside bracket, as shown.
Note that Side carrier bracket is bolted to the front side of Underside bracket (towards the front of the bike).
Tighten the bolts by hand.


8. Connect the RHS Side carrier bracket and RHS Side carrier base, like shown on the photo.
Use M6x20 buttonhead bolts, with M6 washers on both sides, and M6 safety nuts, as shown on the photo.
If something isn't aligned well, loosen M8 bolts holding the RHS Side carrier base and M6x25 bolts holding the RHS Side carrier bracket to the Underside bracket.
Tighten M6x20 buttonhead bolts by hand.


9. Now tighten all the bolts, in the following order - first tighten M8x50 bolts (holding the RHS Side carrier base to the bike) to the 15 Nm; next, tighten M6x20 buttonhead bolts (holding RHS Side carrier bracket to the RHS Side carrier base); at last, tighten M6x25 allen head bolts (holding RHS Side carrier bracket to the Underside bracket) to 6-7 Nm.

10. Repeat this for the other side too.
11. After few rides, re-torque the bolts to the spec.
B. Integration of Tenere 700 Side Carriers with Perun moto T700 Top luggage rack
For this integration, you will need the hardware supplied with Side carriers plus the hardware supplied with the Top luggage rack.
First, install the T700 Side carriers, as per instructions above (section A).
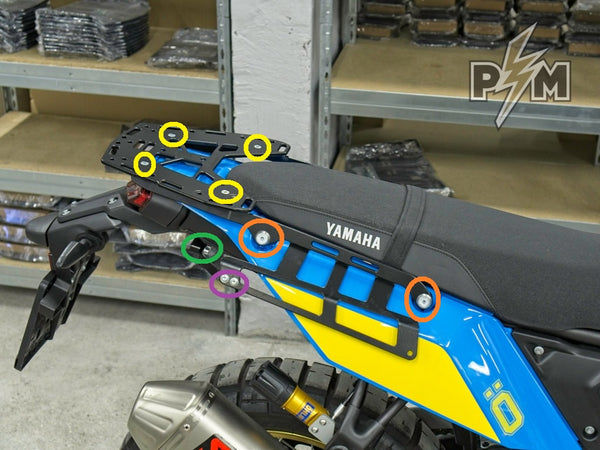
1. Loosen up the bolts marked with green. Remove the bolts marked with red. On both sides.

2. If you already had Perun moto T700 Top luggage rack installed, just loosen up the bolts shown on the photo below.

Or, if you didn't install the T700 Top luggage rack before, check T700 Top luggage rack instructions - from paragraph 1 - 4. Just hand tighten the bolts, they should remain loose.
3. Put T700 Top luggage rack assembly over the T700 Side carriers, as shown on the photo below.
Use M8x55 countersunk bolts supplied with the T700 Top luggage rack (not the M8x50 countersunk bolts supplied with T700 Side carriers) and M8 countersunk 3D washers to bolt the assembly to the bike.

T700 Top luggage rack assembly is installed over the T700 Side carriers assembly!

4. Make sure everything is well aligned and hand tighten M8x55 bolts.
5. Then, tighten the bolts in the following order - first tighten M8x55 bolts (holding the assembly to the bike) to the 15 Nm - marked with orange; next, tighten M6x20 buttonhead bolts (holding RHS Side carrier bracket to the RHS Side carrier base) - marked with purple; than, tighten M6x25 allen head bolts (holding RHS Side carrier bracket to the Underside bracket) to 6-7 Nm - marked with green; at the end, tighten M6x20 and M6x16 bolts on the Top luggage rack plate - marked with yellow. On both sides, simultaneously.

6. After few rides, re-torque the bolts to the spec.

